Well, it took us two years, but we outgrew the Winnebeggo v1.0. Ok, we really outgrew it last year, but I needed a winter to come up with the next iteration. So, everyone, it is with great anticipation that I introduce the Winnebeggo v2.0.
We start the whole thing off with the same base frame as the Winnebeggo 1.0, a 10′ x 20′ frame bolted to the top of an old running gear. The top structure is going to be made of 10′ hoops of 3/4″ conduit that we made with our hoop bending jig. Hoops (and their accompanying crossbeam on the base) are spaced every 4′.

After all the hoops and their uprights are witness marked and labeled(zoom in on the pic to see them where the upright 2×4’s meet the base), the whole upright and hoop part can be taken back down. Through the middle you may notice that smaller crossbeams have been added every 16″ where the walkway will be. Oh, and you’ll also have noticed all the boards running lengthwise that we added to the base; those are some 1×3 furring strips (which are really cheap) that will serve to distribute the weight a little bit.
Notice that we’ve left a nice wide, well-supported aisle down through the middle of the Winnebeggo. That ought to let us walk down the length of the whole contraption to get access to all the nooks and crannies. Believe me, you’ll need to eventually and sooner than you think.
So after that little carpentry project, we’ll take all the uprights down, stripping it all back down to the base.
No really, take them all down, because that’ll make the next part much easier.

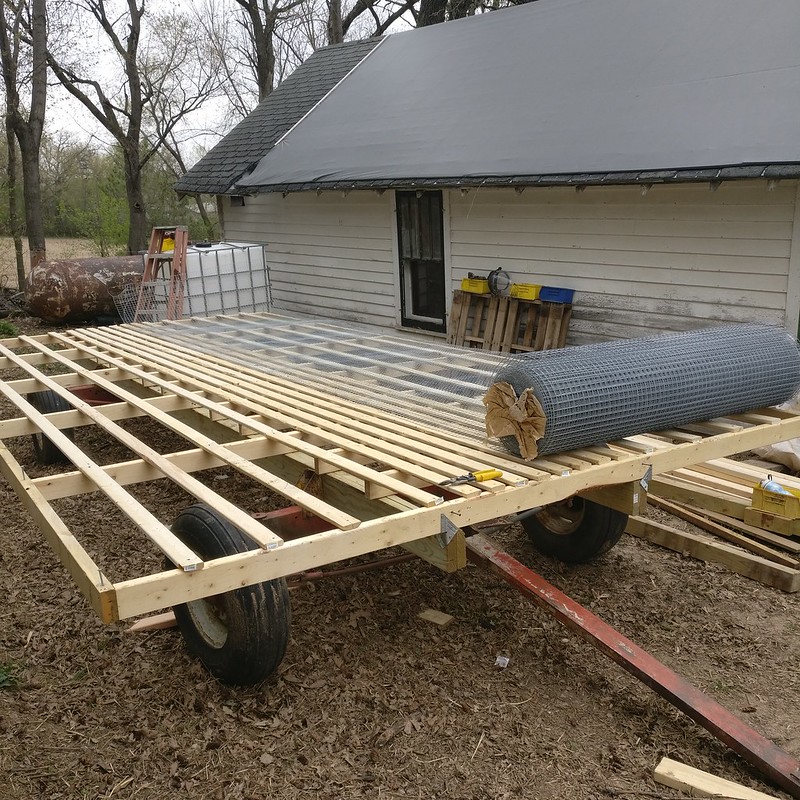
We took delivery of this lovely 200-plus pound roll of wire mesh. This stuff is 1″x1″ mesh that is 5′ wide.
Roll it up onto the wagon using a ramp made of extra boards and get ready to staple.
Two passes is all it should take, for a total of 40′ of mesh.
After it’s all down you can go back and cut out the holes where the uprights will need to go back in. This is where all the witness marks and labeling will come in real handy.

Skin the whole contraption in sheet metal and it really starts to look like something.

Next up, add in a whole lot of roosting bars. Ideally this shelter will accommodate 250 hens, so at 1.1′ of roost bar space per hen you’ll need 275 linear feet of roosting bars, or just under fourteen 2″x4″x10′ boards that have been ripped in half.

Last year we ran into trouble with the Winnebeggo v1.0 when we tried to put out all our hens on pasture. While we had plenty of roost bars for everyone, but lots of our hens were not going into the Winnebeggo at night. We figured out that the problem was that the hens were feeling a bit cramped. Everything started working a lot better when we removed about half the hens.
As with most things I build, I try to look online for the correct values to tell me what size to build things. Unfortunately, I couldn’t find the information I was looking for. Turns out there aren’t a whole lot of pastured-roost builders out there, and fewer still who put all the technical details online.
So here you go internet, here’s my hard-earned research on the subject.
Winnebeggo v1.0
Volume – 660ft³
Hen capacity – 220
Volume/hen – 3ft³
Winnebeggo v2.0
Volume – 800ft³
Hen capacity – 250
Volume/hen – 3.2ft³
So we’ve been using the new Winnebeggo v2.0 for just over a month now, and other than a little nestbox-training that was necessary, we’ve been really happy with it. I cannot emphasize how nice it is to be able to have a full-size human walkway through the length of the Winnebeggo. It is inevetable that one will need to access some seldom-used corner of the Winnebeggo, so it’s nice not to have to crab-walk awkwardly through a confined space to do so. The chickens seem pretty happy in the new Winnebeggo too. And in a final measure of improvement, the percentage of chickens who have trouble figureing out how to go in at night has dropped, from 10% with the Winnebeggo v1.0 down to a mere 3% with the new version.
What about the nestboxes though? We got rid of the integrated nestboxes of the Winnebeggo v1.0, so we had to figure out something a little different. Stay tuned for that riveting saga…
This is fantastic information, thank you. How much space is there between the roosting bars please? It looks like a foot or so, but just wondered if there is a distance you recommend.
Thank you
Christine
Hi Christine,
I mostly just eyeballed the distance between roost bars, but I believe that they’re anywhere from 10-12″ apart.